Originally published at: https://www.privacyidea.org/versatile-2fa-single-sign-on-with-keycloak-and-privacyidea/
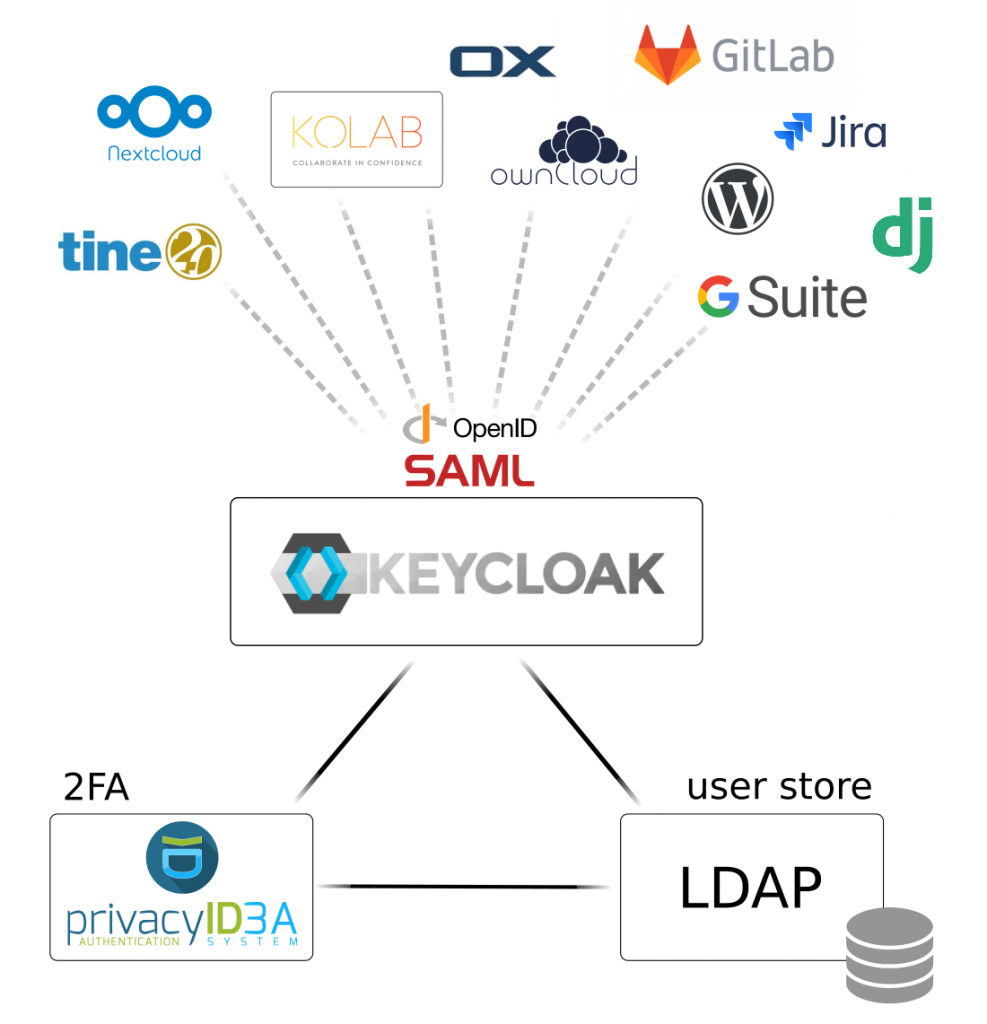
In a previous article, we wrote about benefits and risks of single sign-on (SSO) in enterprise environments and how a solid 2-factor-authentication solution as provided by privacyIDEA helps reduce risks. In this article we will demonstrate how to setup a SSO system with Keycloak and privacyIDEA. As an example application we integrate the Kolab Groupware Server and setup the Roundcubemail webmailer to authenticate with OpenID Connect (OIDC) and a second factor managed by privacyIDEA. Other popular collaboration platforms such as Tine 2.0 or Open-Xchange and many other applications will also work with Keycloak and privacyIDEA as long as they support at least one standard SSO protocol.
First, we setup three machines with Ubuntu Server 18.04 and provide similar /etc/hosts files to each of them. For a proper setup, Kolab requires a fully qualified domain name. We choose kolab.netknights.it.
127.0.0.1      localhost
127.0.1.1      kolab
192.168.56.200 kolab.netknights.it    kolab
192.168.56.201 pi.netknights.it       pi
192.168.56.202 keycloak.netknights.it keycloak
To put the system into action, one would have to configure DNS and NAT properly so that the server is reachable from the internet. DNS record of type A, AAAA and MX are crucial to do this. You may read about this requirement in the Kolab docs “preparing the system“. For this proof of concept we will not use any logical volumes nor discuss firewall setups or SSL transport layer security.
After updating the initial Ubuntu Server systems, we install privacyIDEA, Keycloak and Kolab following their general installing instructions. We start with Kolab, since in this scenario, we would like to attach the ds-389 LDAP directory delivered by Kolab to our backend, i.e. Keycloak and privacyIDEA.
Kolab 16 Installation
The primary OS supported by Kolab is CentOS, which is also supported by privacyIDEA. However, there are also Kolab and privacyIDEA packages available for Ubuntu 18.04. We will use these for our setup. The install instructions can be found at docs.kolab.org. We summarize them here for convenience
# Add repositories for apt to /etc/sources/
~$ echo 'deb http://obs.kolabsys.com/repositories/Kolab:/16/Ubuntu_18.04/ ./ deb-src http://obs.kolabsys.com/repositories/Kolab:/16/Ubuntu_18.04/ ./' \
| tee /etc/apt/sources.list.d/kolab.list
# Add signing key
~$ wget -q -O- https://ssl.kolabsys.com/community.asc | apt-key add -
~$ echo -e 'Package: *\nPin: origin obs.kolabsys.com\nPin-Priority: 501' \
| tee /etc/apt/preferences.d/kolab
~$ apt-get update
~$ apt-get install kolab
We let the postfix SMTP service be configured as “Internet with smarthost”. Outbound email will be relayed to another (trusted) mail server, e.g. the one of your ISP. Inbound mail will reach postfix on port 25 if your DNS records are configured correctly. After installation the configuration script is called via
~$ setup-kolab
It will ask for some information and several passwords. The password for the directory manager will be used to first login, so remember it. Also passwords for a the cyrus-imapd administrator, a kolab-service user, the mysql database root user and several database passwords are needed. Note, that all of them are stored in the /etc/kolab/kolab.conf file and only very few are needed for interactive logins.
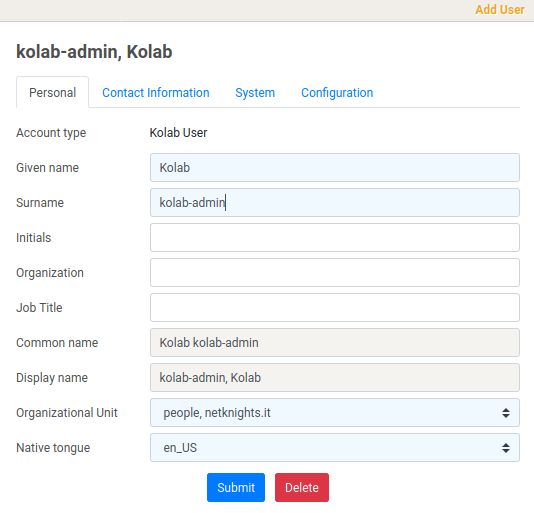
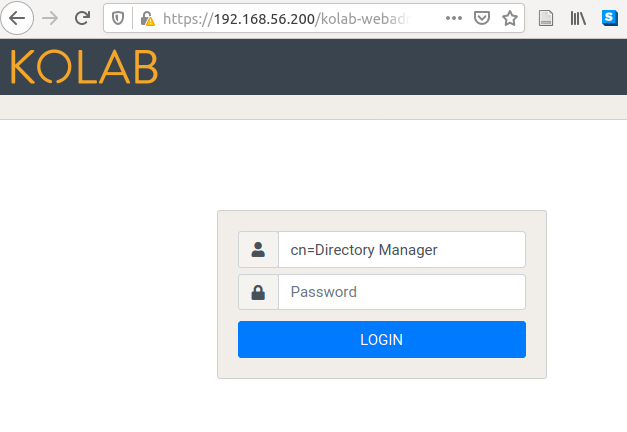
Kolab comes without a predefined admin user. Only the directory admin is defined which should not be used for user administration. So we login as “cn=Directory Manager” and define a new admin user. In our default setup, the UID is generated from the surname (check the “System” tab), so we choose kolab-admin to differentiate from pi-admin and keycloak-admin later.
On the System tab we set the predefined kolab-admin role for the user to grant him access for user management. Also set a password.
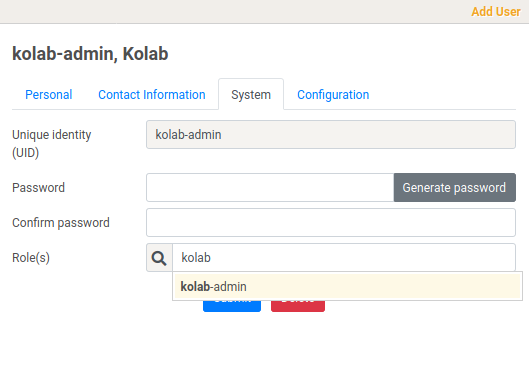
Hit submit to complete the process. Next add another ordinary user to test the second factor login later on. We call this user test-user.
privacyIDEA 3.x Installation
Now, we setup privacyIDEA. Install instructions for the most recent version can be found at readthedocs.privacyidea.io. We install the official Ubuntu packages, specifically the privacyidea-apache2 package. The installation only takes few minutes. After creating the admin user, here called pi-admin, with
~$ pi-manage admin add pi-admin -e pi-admin@localhost
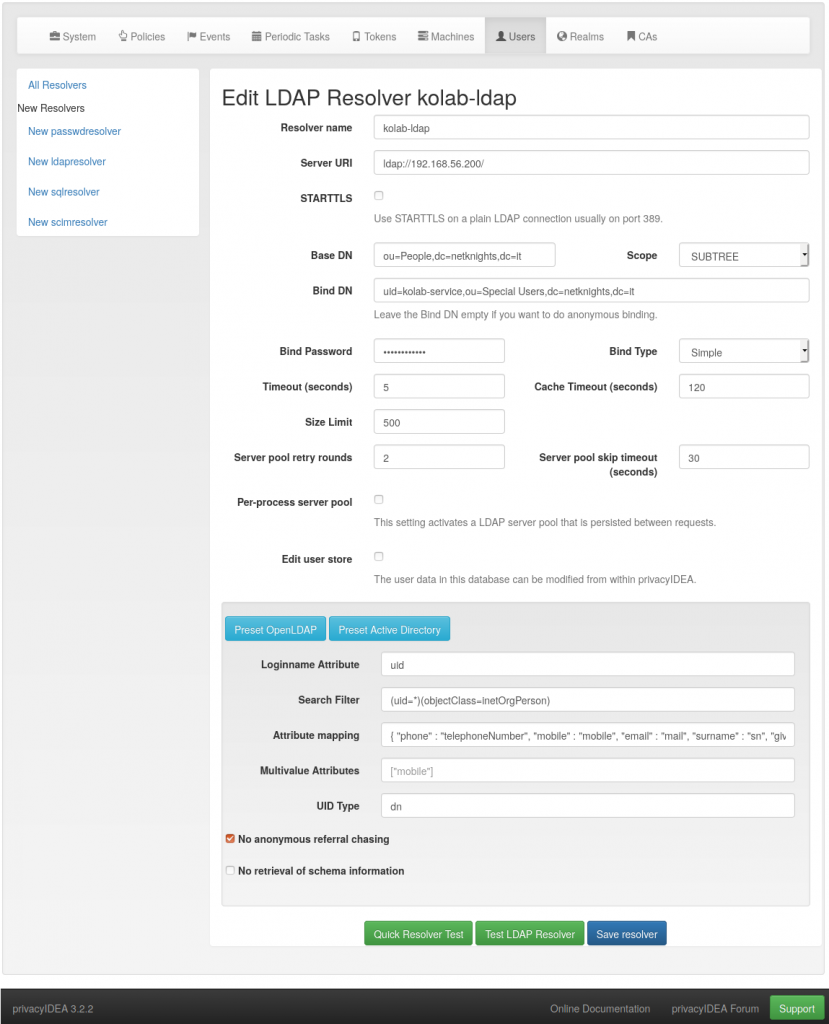
we login to the UI. privacyIDEA needs to access the LDAP directory provided by Kolab, so we create an LDAP resolver and use the Kolab service account created above via “Config->Users->New ldapresolver”. The dn and password for the kolab-service account can be checked in the file /etc/kolab/kolab.conf. We use the OpenLDAP preset given by privacyIDEA but change the UID type to “dn”. The resolver test buttons help to avoid typos and to check the connection. For the test, we leave TLS to be configured later.
The resolver is added to a new realm kolab_realm at “Config->Realms->Create Realm”.
You should now be able to see the users within privacyIDEA.

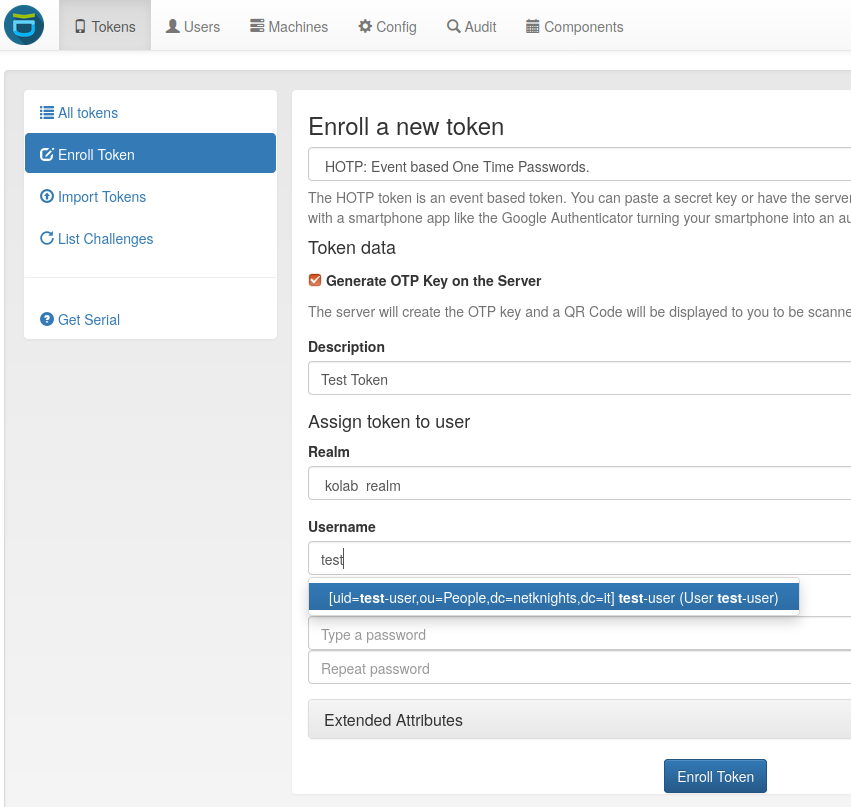
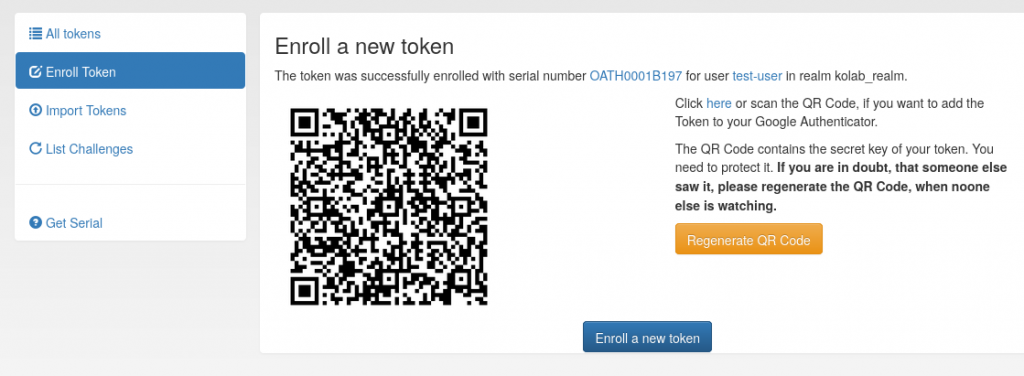
We will enroll an HOTP token for test-user with the privacyIDEA App, available from Google Play Store. You may alternatively use the Google Authenticator. Install the app and proceed with the enrollment as given below. The privacyIDEA UI auto-completes the username as you type. The generated QR code must be scanned with the App to complete the enrollment.
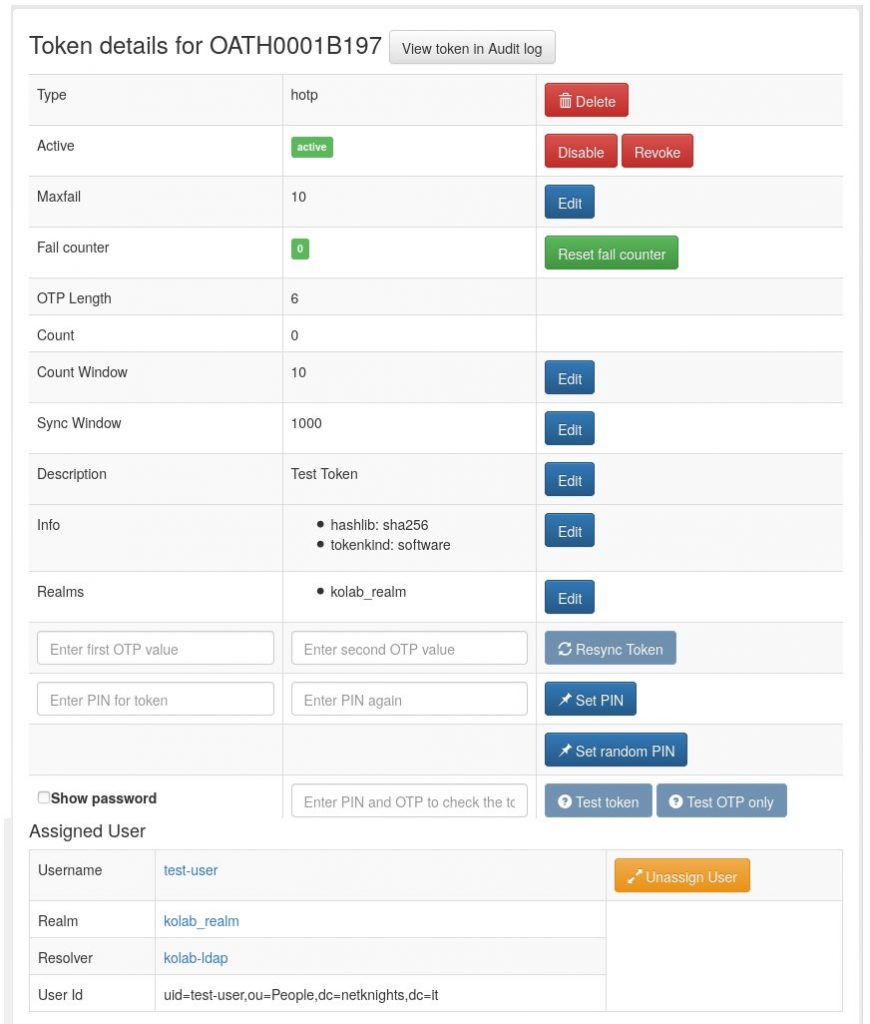
The OTP token is now assigned to the user test-user and the privacyIDEA app on your phone should display a six-digits OTP code.
To issue trigger challenges asking for an OTP key on user login, privacyIDEA needs an authorization. Since we do not want our pi-admin password to flow through the wire all the time, we create another, unpriviledged admin user on the privacyIDEA terminal.
~$ pi-manage admin add trigger-admin -e trigger-admin@localhost
The trigger-admin needs a superuser policy to restrict the access. In “Config->Policies”, first create a default superuser policy using the “superuser” template. Add only the pi-admin to the admin field. Then add another policy without template. Name it trigger_admin, select the scope admin, add the action triggerchallenge and add the created trigger-admin to the admin field. Now, we have two admin users. pi-admin has the default superuser access and trigger-admin has only very limited access allowing to trigger the challenge.
As privacyIDEA is now up and running, we proceed with the Keycloak server, which will act as the central element in the SSO environment.
Keycloak 9 Installation
Start the Keycloak installation by downloading the Keycloak standalone server from keycloak.org. General install information is found in the “getting started” guide. A detailed guide how to integrate Keycloak with systemd on Ubuntu Server 18.04 LTS is found here. The necessary steps are summarized below.
~$ sudo apt-get update
~$ sudo apt-get install default-jre-headless
# Install Keycloak 9
~$ mkdir -p /opt/keycloak /etc/keycloak
~$ wget https://downloads.jboss.org/keycloak/9.0.0/keycloak-9.0.0.tar.gz
~$ tar -xvzf keycloak-9.0.0.tar.gz
~$ mv keycloak-9.0.0.tar.gz /opt/keycloak
# Add keycloak user
~$ groupadd keycloak
~$ useradd -r -g keycloak -d /opt/keycloak -s /sbin/nologin keycloak
~$ chown -R keycloak: /opt/keycloak
~$ chmod o+x /opt/keycloak/bin/
# Place config file
~$ cp /opt/keycloak/docs/contrib/scripts/systemd/wildfly.conf /etc/keycloak/keycloak.conf
# Setup systemd files
~$ sed 's/wildfly/keycloak/' /opt/keycloak/docs/contrib/scripts/systemd/launch.sh \
| tee /opt/keycloak/bin/launch.sh
~$ chown keycloak: /opt/keycloak/bin/launch.sh
~$ sed 's/wildfly/keycloak/g' /opt/keycloak/docs/contrib/scripts/systemd/wildfly.service \
| tee /etc/systemd/system/keycloak.service
# Enable and start the daemon
~$ systemctl daemon-reload
~$ systemctl enable keycloak
~$ systemctl start keycloak
~$ systemctl status keycloak
# Add admin user
~$ /opt/keycloak/bin/add-user-keycloak.sh -r master -u keycloak-admin -p <password>
~$ systemctl restart keycloak
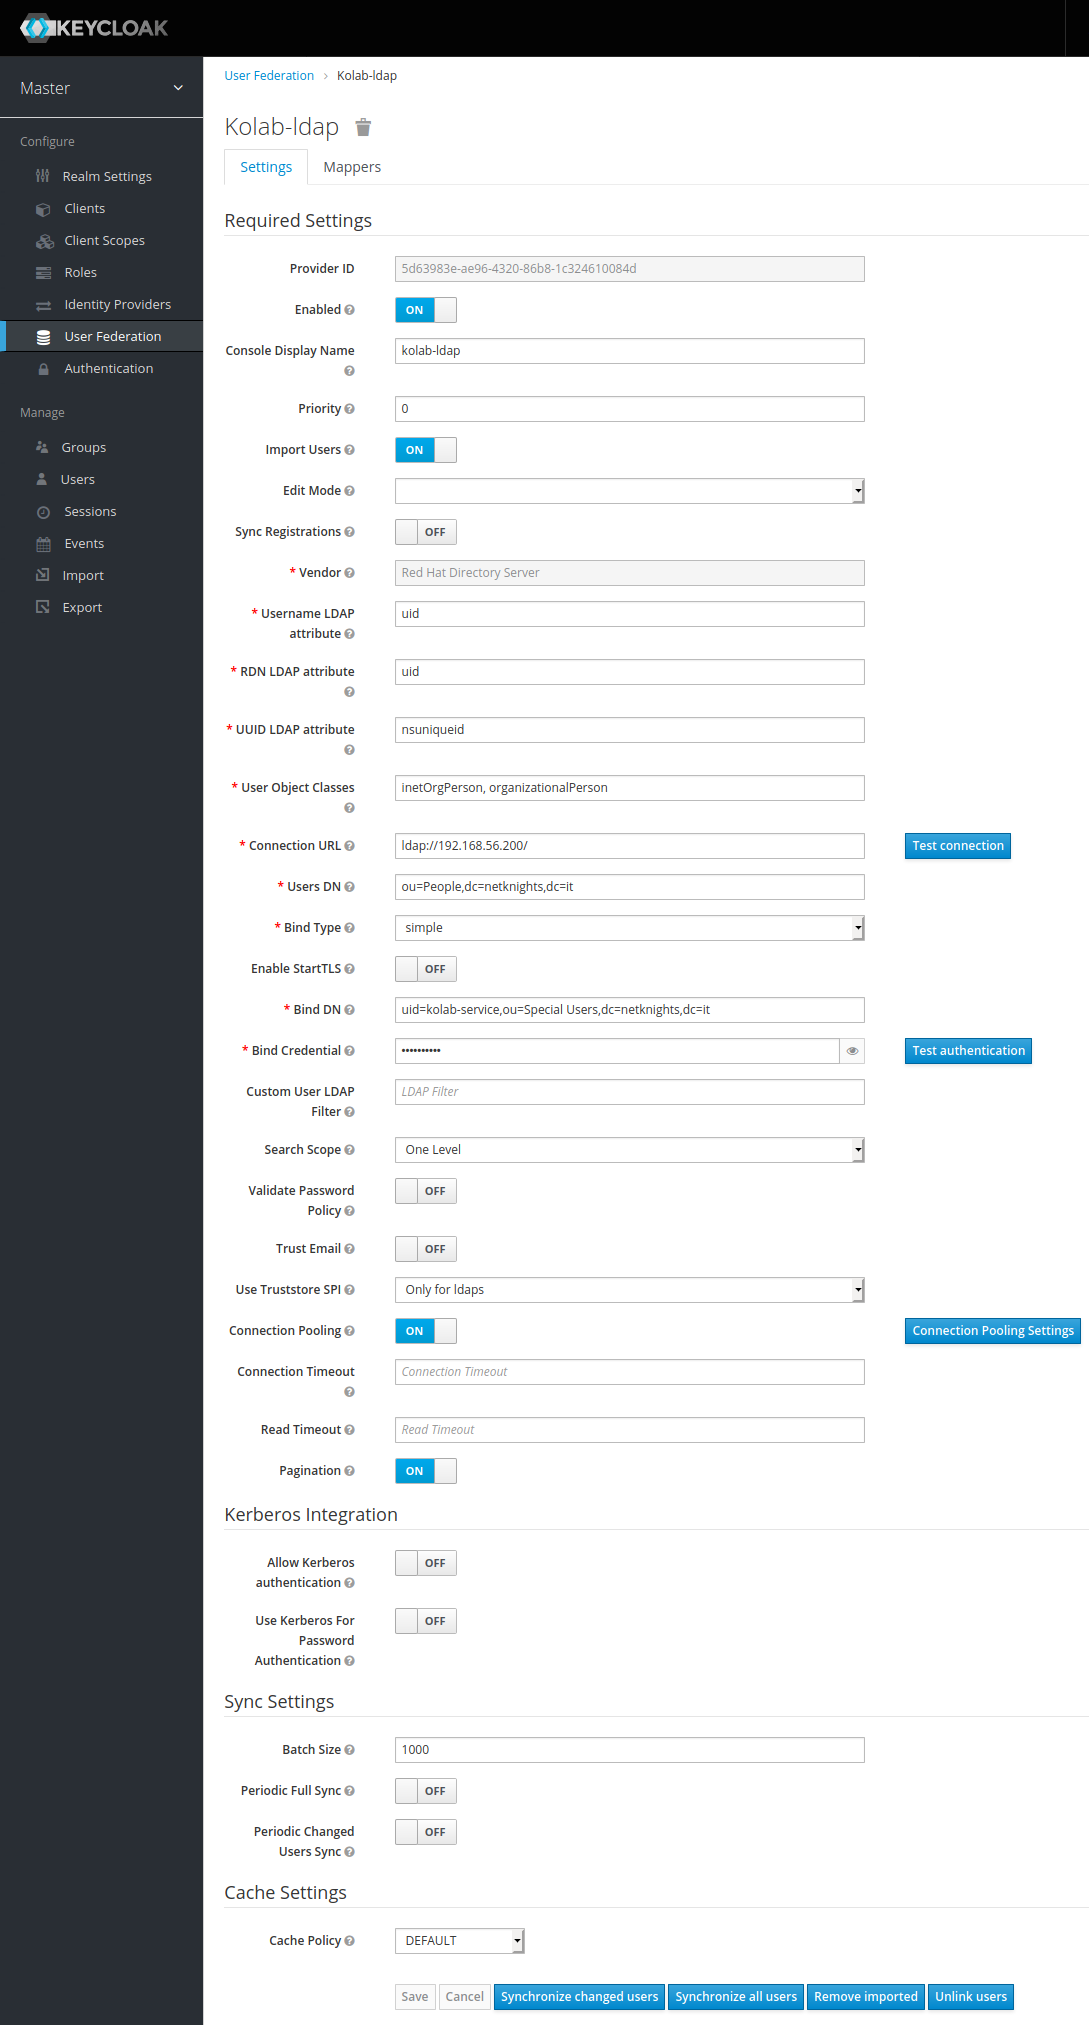
Now you should be greeted by Keycloak at http://192.168.56.202:8080. Login with your created keycloak-admin user. As Keycloak should validate the user logins it has to have access to the user store. In “User Federation”, add an LDAP provider with the following settings. The kolab-service account is used as an unpriviledged bind and again we disable TLS for the test setup.
Hit “Synchronize all users” to pull the users from LDAP to Keycloak. You may enable the periodic sync to keep the Keycloak user store up-to-date.
Important: The keycloak-admin should not be required to provide a second factor to prevent locking the configuration while testing. For this purpose, define a no2fa group in “Groups” and add the keycloak-admin to that group in “Users”.
Next, privacyIDEA is integrated with Keycloak. Following our earlier article on the integration of Django with Keycloak and privacyIDEA, we download the two files PrivacyIDEA-Provider.jar and privacyIDEA.ftl of the most recent release of the privacyIDEA keycloak-provider and install it to Keycloak.
~$ wget https://github.com/privacyidea/keycloak-provider/releases/download/v0.3/PrivacyIDEA-Provider.jar
~$ wget https://github.com/privacyidea/keycloak-provider/releases/download/v0.3/privacyIDEA.ftl
~$ cp PrivacyIDEA-Provider.jar /opt/keycloak/standalone/deployment/
~$ cp privacyIDEA.ftl /opt/keycloak/themes/base/login/
In Keycloak, the authentication is managed in so called “Authentication Flows”. Copy the default browser-based flow below and rename it to PrivacyIDEA.
Add an execution to “PrivacyIDEA Forms” and choose the installed plugin called PrivacyIDEA from the list.

Delete the unnecessary items in the flow (or set them to disabled), so that only “PrivacyIDEA Forms” and “Cookie” remain. The authentication flow should now look like this:
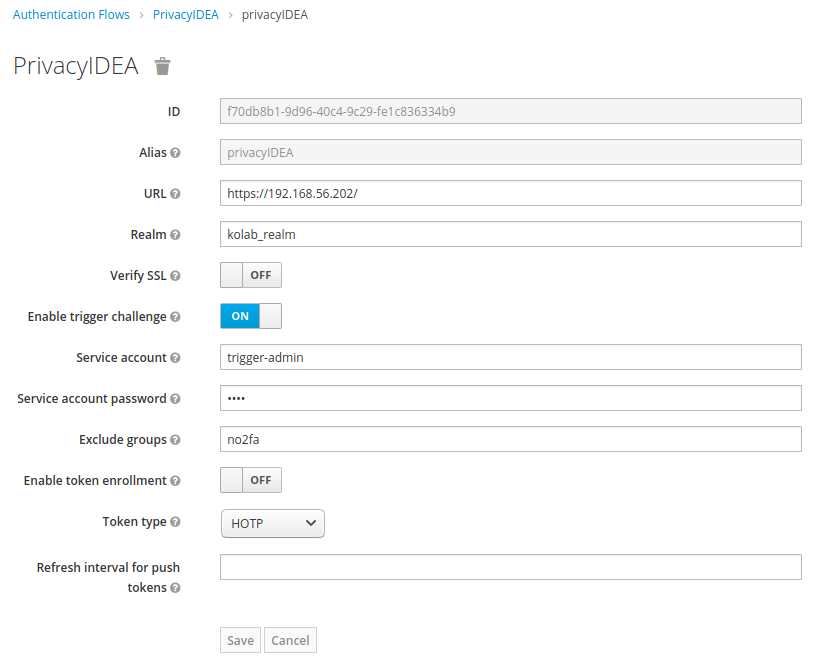
We set PrivacyIDEA to REQUIRED here, which means that additionally to username and password, the second factor is required for all users. We have to configure the plugin to reach our privacyIDEA server at https://192.168.56.202. We disable SSL-verification for the self-signed certificate here, which you must not do in a productive environment. Members of the no2fa group, defined above will not be asked for their second factor. For issuing the trigger challenge a service account is needed. We use the trigger-admin account created in privacyIDEA earlier.
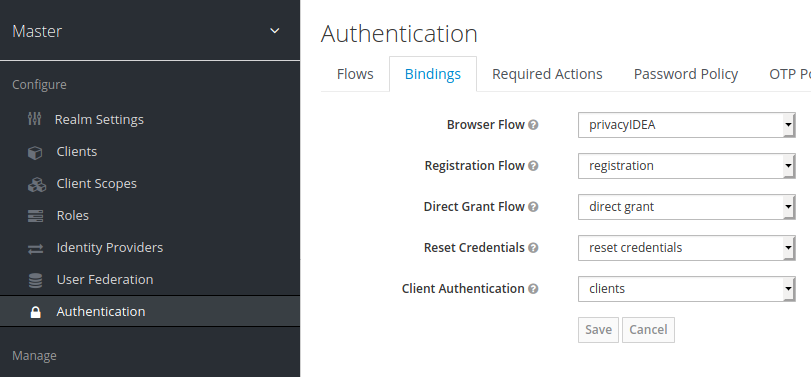
Set the edited authentication flow as default browser flow in “Bindings”.
So privacyIDEA is now configured to challenge the second factor for every user. The last step is to enable OpenID Connect logins in roundcubemail.
Installation of the Kolab SSO plugin
For the OIDC, Kolab provides the kolab_sso plugin for Roundcubemail which is available on git.kolab.org. Clone the repository and copy the plugin to the Roundcubemail directory to install it.
~$ git clone https://git.kolab.org/diffusion/RPK/roundcubemail-plugins-kolab.git
~$ cp -r roundcubemail-plugins-kolab/plugins/kolab_sso/ /usr/share/roundcubemail/plugins/
Place the default configuration file.
~$ cp /usr/share/roundcubemail/plugins/kolab_sso/config.inc.php.dist /etc/roundcubemail/kolab_sso.inc.php
Apache should redirect host.roundcube/sso to host.roundcube/?_task=login&_action=sso, since keycloak does not support parameters in urls. It will display “Invalid parameter: redirect_uri”. Add the redirect as follows to /etc/apache2/sites-enabled/roundcubemail.conf.
RewriteEngine On
RewriteCond %{REQUEST_URI} ^/roundcubemail
RewriteRule "^sso" "/roundcubemail/?_task=login&_action=sso" [L,QSA]
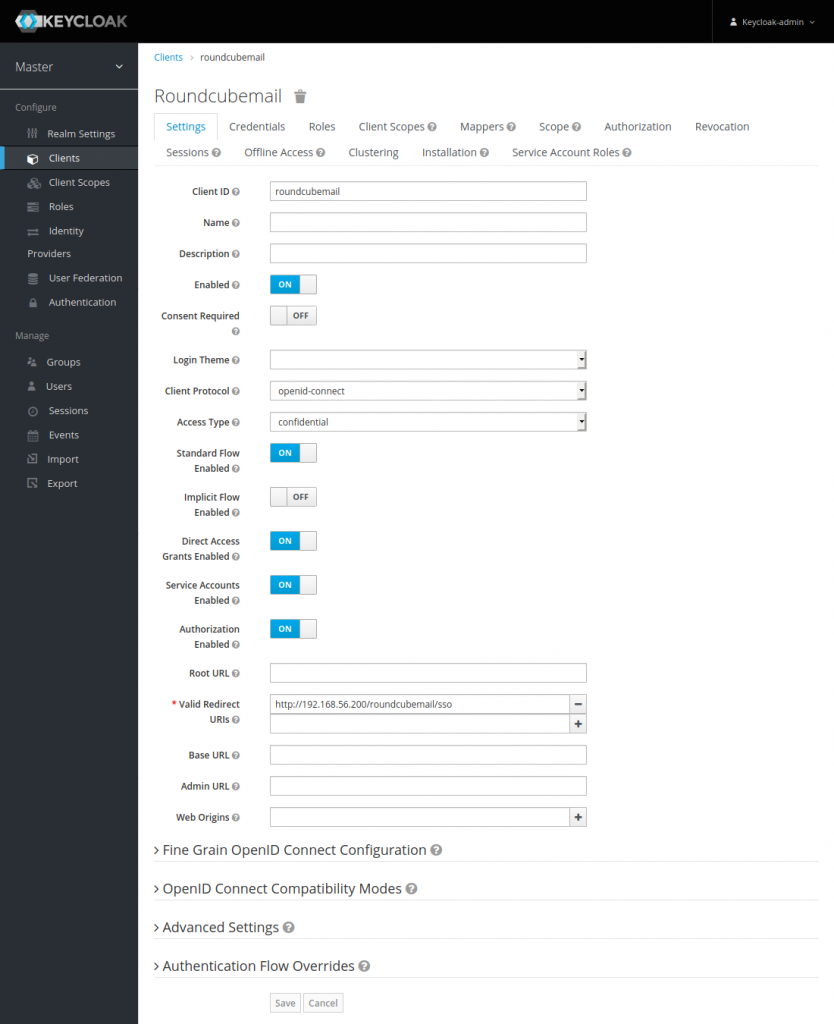
We proceed on the Keycloak machine and add Roundcubemail as a new OpenID Connect client as given below.
Save the form to access the “Credentials” tab. We will soon need the generated secret again.
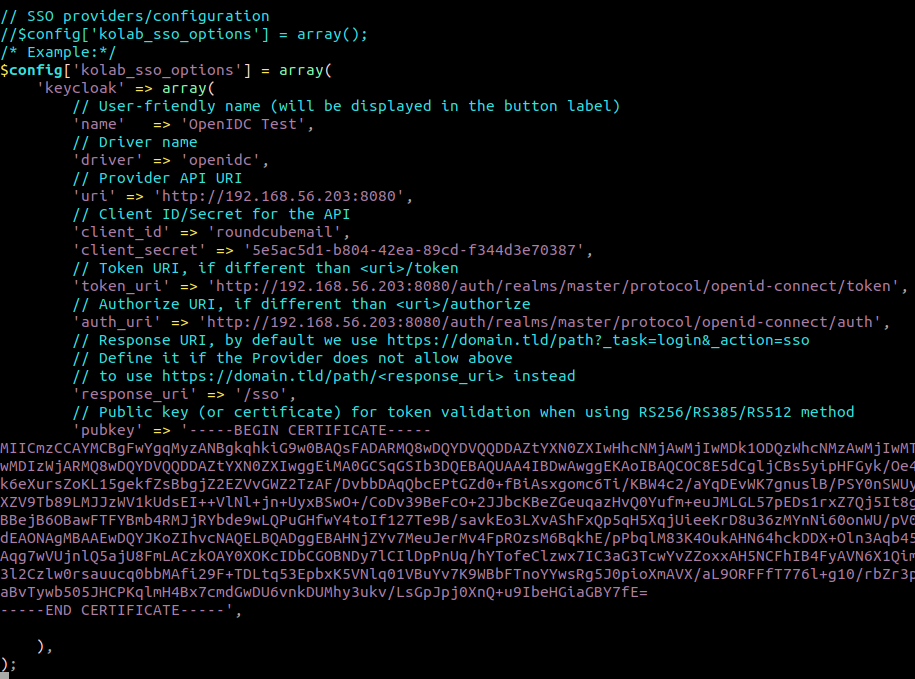
The kolab_sso plugin needs the certificate of the Keycloak server during the OpenID Connect authentication process. It is available from the Keycloak management console in the “Realm Settings”.
Add the key and the client secret alongside the token_uri and auth_uri to the kolab_sso.inc.php configuration file. Make sure that the public key copied from keycloak is properly formatted. The IMAP, SMTP and LDAP credentials in the top part of the file are required for accessing the mailbox, sending emails and accessing the server addressbooks. Configure them accordingly.
After successfully testing the ordinary password login with Roundcubemail at http://192.168.56.200/roundcubemail, you may disable the password login to allow only OpenID Connect by setting
$config['kolab_sso_disable_login'] = true;
in kolab_sso.inc.php.
Test the login
We are now ready to test the OpenID Connect login at Roundcubemail. Navigate once again to http://192.168.56.200/roundcubemail to test the login. You may monitor some log files during the process.
/var/log/privacyidea/privacyidea.log
/var/log/roundcubemail/*
/opt/keycloak/standalone/log/*
-
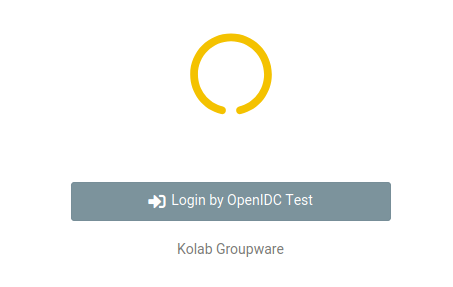 The Roundcubemail kolab_sso login…
 -
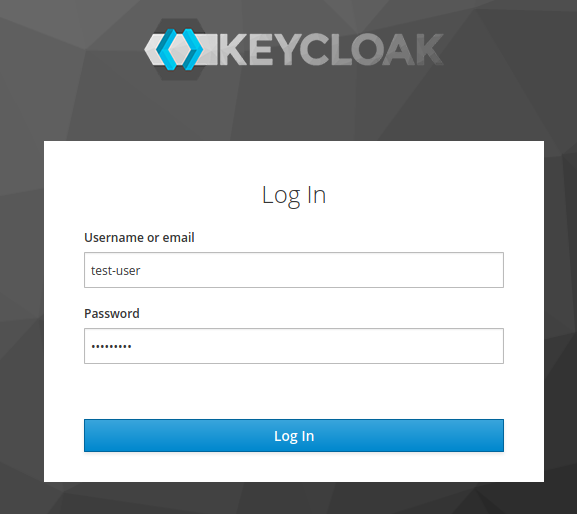 gets redirected to Keycloak.
 -
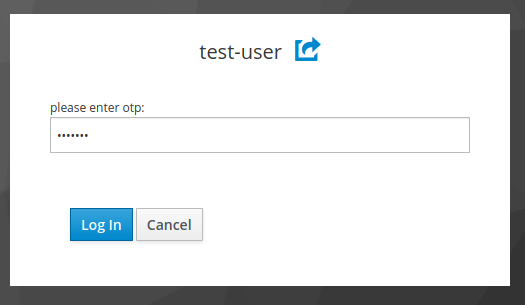 After typing the password, the user is prompted to provide a second factor…
 -
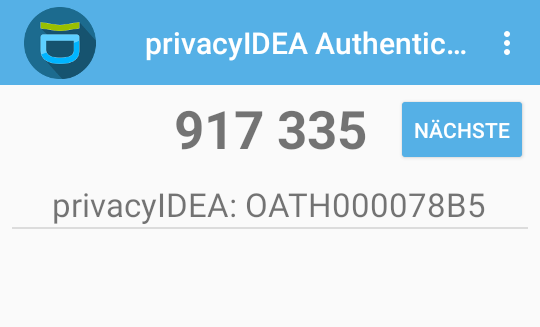 …which we get in this case from the OTP token in the privacyIDEA app.
 -
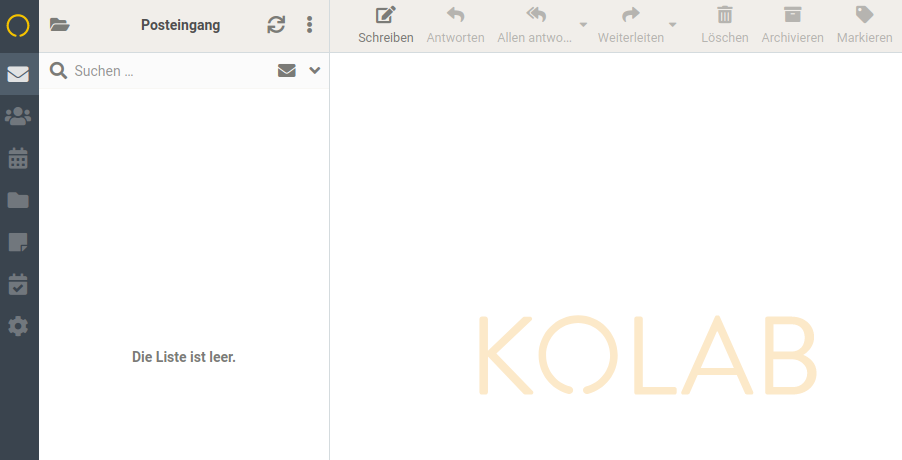 The correct OTP gets us directly to Roundcubemail webmail.
Conclusion
We demonstrated the integration of privacyIDEA with Keycloak to provide a solid basis to secure your applications with a second factor in a single sign-on (SSO) environment. For maximum flexibility, the system relies on standard protocols such as SAML or OpenID Connect (OIDC). The privacyIDEA keycloak-provider is designed to perfectly fit the two components together, uniting the rich identity management capabilities of Keycloak and the powerful multi factor management of privacyIDEA.
We chose the Roundcubemail webmailer of the Kolab Collaboration Server as an example application. The kolab_sso plugin provided the necessary interface to connect via OIDC to easily enhance security by adding a second factor managed by privacyIDEA. The setup of other popular open collaboration platforms such as Tine 2.0 or Open-Xchange work similarly.
Including additional applications in this setup is very easy as long as they support at least one SSO protocol. These applications do not even to be hosted on your own servers. Nowadays, most cloud-based applications offer both, the possibility to use an external identity provider and to use OIDC. Thus, you can also use remote services with your own user base, defining access-rules to fit your needs.
